Showing posts with label DIY. Show all posts

Monday, 1 December 2014

// DIY "Get Cozy" Gift Basket


Gift baskets are one of my absolute favorite things to give people as gifts. You can make a gift basket out of anything and with any theme. I love that! It's a great way to squeeze in a lot of special little treats for a variety of people, too. For the Michaels Makers December challenge, we were tasked with coming up with a DIY gift and showing how we'd wrap it. Well, my basket isn't really "wrapped" but I like to think that it's more about the presentation than actual wrapping.

This is my "Get Cozy" Christmas basket! It's overflowing with hot beverages to suit any taste. Coffees, teas, and cocoas, too! Since there are a lot of family "clusters" at our Christmases, this is the perfect solution for gifting something for everyone, without spending a fortune and without needing to get too specific. 

I included a bevy of goodies in this basket. Everything from whole bean coffee, chocolate covered espresso beans, tea (loose leaf, sachets, bags), a few different hot cocoa mixes, some fun neon cocoa marshmallows, local honey, and DIY coffee syrup (caramel!) The coffee syrup is great becasue you can get so many servings out of one little batch. I tossed in a fun tea towel, box of caramel chocolates, and some tea bags for the loose leaf tea, also. The basket itself is a galvanized tin from Michaels and I just added some floral foam to fill it out a bit before adding a cozy blanket. I used a variety of glass jars from Michaels to hold some of the goodies in the box. (These remained water-tight for me since they were standing up - If you decide to spend a basket like this in the mail, you might want to try a different type of jar just to ensure they don't leak in transit!)


You can get super creative and add chalkboard labels, or even add a bit of chalkboard paint to the front of the jars to highlight what each item is. I had planned on adding some pie boxes filled with some ooey gooey pie we made for Thanksgiving, but uh... we sort of ate it all haha! 

I definitely plan on giving a bunch of gift baskets again this year. Filled with treats like this, homemade banana bread, DIY/handmade trinkets, etc. There's just something so fun about gift baskets! Giving and receiving them is so awesome. It's like a gift that just keeps on giving, ya know?

-----------------------------------------------

If you're still mulling over what to give your loved ones this year, check out the holiday gift guide from Michaels. If you didn't catch our dream tree reveal or tree decorating tips, be sure to check those out, too! And finally, if you're in the crafty mood and want to give the gift of a homemade trinket, check out the DIY gift projects on the Michaels Pinterest page! My fellow Michaels Makers are sharing their own DIY gifts and wrappings below, too. Inspiration overload!

Are you a gift basket type of person? What type/theme basket would be your ultimate favorite to receive? I might need to share a few more of the ones I end up making! xo

Tuesday, 17 June 2014

// Bunny Ear Baby Teether DIY


The nesting instinct has kicked in full throttle as of late, and I've been trying to be as productive as I can on all ends of the spectrum. I've been perusing Etsy lately looking for unique toys for the nursery and I stumbled upon some cloth teething rings. They looked so incredibly simple to make so I thought I'd give it a go. Even though Baby Flynn won't be using these for quite some time, I wanted to get a head start on some simple DIYs because who knows if I'll even be up to thinking about doing them once he's here. These are seriously so easy to do and they take about 5 minutes each (if that!)... and the best part? They're so cheap to make! Since they take such little amounts of fabric I've been tearing through my scraps to make some and even sending them to a few friends who are expecting. I love that I can just toss the fabric part in the wash and scrub the wooden rings with some soap and water in order for them to be good as new again.

SUPPLIES:

+ Sewing maching
+ 1/4 yd. fabric (organic cotton is great for this!)
+ Wooden teething rings (I bought mine on Etsy)
+ Thread
+ Scissors
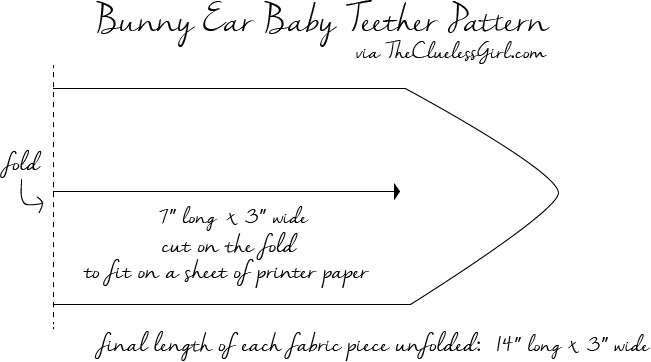
+ This handy template (Optional. I printed mine on 8.5x11" cardstock + cut on the fold)*


INSTRUCTIONS:

Step One: Since I only had 8.5x11" cardstock available at home, I opted to print my template* at 100%, but "in half" so I could cut on the fold. (Do not scale the image to fit your paper - If the template gives you trouble,  just cut a 14" x 3" rectangle [or 7" x 3" on the fold like I did] and shape the ends however you prefer!) Because my paper was smaller than my template, I just doubled over my fabric and made sure the short end of my pattern piece was on the fold. Since I had really sharp scissors I was actually able to cut both pattern pieces at the same time (Your fabric should be 4 layers thick to do this!) This way I ended up with 2 perfectly uniform 14x3" pieces of cut fabric. Win/win!

Step Two: I placed the wrong sides of the fabric together and started my stitch in the middle of the longest side. I used a 1/4" seam allowance. I sewed all of the sides together, but left a 1" opening in the middle of the longest side so I could turn my fabric piece right side out. Once I had the fabric right side out, I poked the seam so it'd be flat and then I ironed the whole thing. This makes it easier to sew up the little gap. You can choose to do a slip-stitch or you can keep it simple by just running a topstitch around the entire fabric piece.

Step Three: After the fabric piece is sewn, fold it in half and slip it through one side of the wooden ring. Then take the "bunny ears" and loop them through the center part of the ring. Once you pull tight your teether will start taking shape. You can iron the bunny ears of your teether one last time to make them nice and crisp looking. Voila! You have a teether! Told you it was simple...


I opted to do a fatter, rounder top on the mint polka dot teether and I love how cute they all look together. I wish I had ordered more wooden rings but now that I know how simple it is to make these, I plan on cranking them out like crazy! They make the perfect little "happy" for babies of friends and family. And since they're so inexpensive and easy to make, I won't be heartbroken when they inevitably get lost.

Let me know if you decide to give it a whirl! I'd love to see what you come up with (and the fabrics you choose!) Happy Tuesday! xo

* I used the full/original template in my photos, but opted to upload a smaller version to cut on the fold so you don't have to mess with your printer's cropping settings! If you have any questions about the template, please leave them below! You can just wing it with a 14" x 3" cut if you prefer!

Friday, 6 June 2014

// Happy Nat'l Donut Day! - DIY Donuts + Recipes Galore!


I don't care how trendy donuts are, I love 'em! I love donut crafts, donut recipes, donut inspired novelty items, etc. Since today is National Donut Day, I thought I'd round up a few of my favorite DIY crafts inspired by the sweet treat, as well as share some delicious recipes, too! Feel free to link to other great recipes or tutorials in the comments if you'd like!


If eating them is more your style, check out these DONUT RECIPES: baked apple donuts // baked funfetti donuts // easy cinnabon donuts

And just for good measure, how about some NOVELTY DONUT ITEMS: this pool float (we have this and love it!) // this donut dress for your little lady // donut coin bank // donut phone case

Here's to hoping you get to enjoy a donut today! xo

Wednesday, 21 May 2014

// End of the Year + DIY Teacher Appreciation Gifts


Yesterday was Toby's last day in pre-K. What?! I remember his very first day like it just happened... in his khaki shorts and his plaid shirt, toting that shark backpack like a boss. It's so crazy to think that was just 9 months ago, but now he's this little man, ya know? I'm so so glad we put him in the program because it has made a world of difference in his demeanor. From how he interacts with people to the knowledge he's gained.... he's a totally different kid. I'm sure that's just the nature of the beast, with kids growing up at what feels like a rapid rate, but I know going to school a year early has impacted him for the better. Toby had two amazing teachers this year and I've grown to adore them so much. Their kindness and consideration for him and their other students knows no bounds. We wanted to do a little something special for them to say thanks, so last night Toby and I painted these terra cotta pots to give to them before his final program today.

I seriously have tears in my eyes writing this... and part of me isn't 100% sure if it's because I'm so floored at how quickly he's growing up, or because he will officially be home 24/7 starting at 11am today haha! Kidding! (Kind of...) The balancing act of being pregnant, a work at home mom, and having a full-time 5 year old at home is about to begin! (I'm terrified!) But really, I've also just been incredibly hormonal so the occasional crying sesh on the way to school may or may not have happened... He's going to be in kindergarten in just a few months! What in the world?! Ah, anyway, enough of that. It's probably only shocking to me haha
I had seen some similar DIY teacher gifts on Pinterest at the beginning of the year, but I never really found who did it first. There's not really anything to it, as I'm sure you can tell. You just take a terra cotta pot, some paint, and then you do that! Haha I didn't photograph the steps because there's seriously no point. I just used whatever I had on hand. The top is acrylic paint and the bottom is chalkboard. Then I used Sharpies for the ruler portion (because no one in our town sells paint pens?!) and acrylic paint for the letters. I let Toby write his name on the back of the pots and I just went over it to make it a bit thicker and uniform. We chose to add in some marigolds since the school colors are black and gold. He handed them to his teachers when he went into school this morning and he looked so handsome in his little oxford shirt and cords. 

Today he has his final program at 10am and I'm counting down the minutes. He's been practicing his singing in the car lately and apparently one of the songs is a rap... and it's hilarious. They even beat box! Mike can't be there since he has such a strict school schedule, but I'll definitely be recording it on my phone so he can experience it, too.

Now I need to scramble to find Toby 2.5 months worth of activities to do so I can be productive while he's home every day! Wish me luck! xo

Wednesday, 26 March 2014

// Project Nursery: v.1


We finally said goodbye to our gorgeous, glittery and pink geometric wall last week. If Baby Flynn had been a girl, we would have undoubtedly kept it. But even since we're bringing a little dude into the world, we couldn't really part with the fun look and feel of a mosaic wall. Rather than scrap the idea all together, we decided to channel the nursery theme around a much more subtle and masculine geometric design. The best part? This project is so budget friendly. The whole thing cost us less than $20!

Now, I've received a lot of questions about how we got the glitter off the original wall, and I'm happy to report it was much easier than we expected! It still took some elbow grease, but a spritzing bottle of warm, soapy water and a putty knife did the trick. After we got all of the glitter off the wall and then off the floor, Mike painted over the pink design with Kilz primer. I busied myself elsewhere for that portion since the fumes are pretty tough. After that he threw down a layer of satin white so the lines would match the finish of the geometrics, and then it was time to tape! If you remember from our original wall, we used regular FrogTape in the .94" size. Last time we had some issues of it rolling up on us, but this time around was perfect! We seriously couldn't have asked for better lines. 

I've also been asked a few times if there's a rhyme or reason to the way we tape the shapes. The simple answer: Nope! The longer answer: We try to do the longer/larger lines first, to sort of set the stage on the wall. Then we break those down into smaller lines. We put more time and effort into the execution this time around, but I think both walls turned out great (I'm totally biased). We didn't use any glitter this time since I didn't want it to get stuck all over everything in the nursery, but we'll be adding some extra color to the room with the accessories. 


If you're still interested in giving a geo wall a whirl, here are a few tips and tricks I'd recommend employing in order to help you get the best results:
  1. Run your fingers over either side of the tape after you put it down. This will push out any wrinkles or bubbles that might have formed while placing. If you don't do this, you run the risk of getting paint caught under them and then ruining your crisp, white line.
  2. After everything is taped, choose your middle color and then mark the shapes you want to be in that hue. We did this by taking small pieces of FrogTape and marking them. Mike was able to start painting the first color while I worked on figuring out what color was next.
  3. When picking colors, get three colors from the same paint swatch for the best results. Of course that's if you want a cohesive ombre color palette. Loads of people have used our original tutorial with contrasting colors and it turned out great. We just greatly prefer the coordinating hues. (Our middle grey is the exact color of our other 3 walls in the nursery. This made it feel really cohesive overall)
  4. Allow the paint to dry for roughly an hour or two, then remove the tape. Try not to leave it on longer than you have to. It's way easier to pull off when the paint is just sticky enough to release, but not so tacky it pulls with the tape. Last time I said ~15 minutes or so, but I think we had a better experience this time around.
  5. Try not to work from left to right or top to bottom with the paint. Step back and view your wall from across the room and pick shapes here and there to mark. This will ensure you have a better balance of colors at the end of the project.
  6. If you're only doing one wall, buy the Valspar paint samples! They're $4 each and 3 of them did our entire wall. That's only $12 spent! (We only have 8' ceilings, but you could make it work with 10' ceilings as well) This does not have to be an expensive undertaking!
  7. If you want to know the Valspar colors we used, they were: Cinder Block, Rocky Slope, and Cathedral Gray (from lightest to darkest).

Now that we have this tiny little bit of the nursery done, I'm excited to try and dive in deeper. It's hard to do much when you don't have the first piece of furniture, but I'm holding out hope we can spring for the items on our dream list. We printed the first pieces of "art" for his room this past weekend and now I just need it to all fall together. It'd be nice if it were that simple, right?

I'm working on a nursery moodboard right now and it's focused around the theme of his room. I'll be sure to share it soon, along with our ultimate nursery wishlist! That way y'all can chime in let me know if you have any experience with any of the brands or products! I'm going into this totally blind haha

Thanks for reading! xo

Friday, 29 November 2013

// DIY Advent Calendar + Activity Ideas (Perfect for Kids!)

DIY Advent Calendar and Activity Ideas for Kids
When it comes to holiday traditions, I really wanted to try and set some in place for Toby as he grows older. I don't want to dictate what will or will not become a tradition, because that's a little weird (right? Just me?), but I'm hoping this one will stick. Who knows if it'll even be successful! Despite the fact that we're not a religious family, I wanted to do an advent calendar of sorts for Toby so he could experience the magic that is the holiday season. I wasn't sure how to balance the little treats and learning actual lessons, so we opted to do an activities-based calendar. Each day in December Toby will unwrap one of the little "treats" and there will also be a piece of paper with an activity on it. The treats are just meant to be little rewards for awesome behavior (and if we're being totally honest, something to tide him over until Christmas is actually here. Have you ever tried explaining time/dates to a 4 year old?!). The activities are meant to promote kindness, selflessness, and family memories. We have everything from "donate toys" to "ride around to look at christmas lights in our pjs". It's something he'll get to look forward to each day and I'm excited to play a part.
Handmade Activity Advent Calendar - DIY - Kaelah Bee
For our calendar we opted to use both wrapping paper and canvas tied up in twine to wrap his treats. I was super inspired by this pin and wanted to do something similar. I nabbed this perfect wrapping paper from Target because I loved that it wasn't holiday-specific. We grabbed a bunch of little trinkets, candy and art projects from the Target "Dollar Spot" bins, as well as a few toys from the Dollar Tree. We don't go crazy at Christmas in our house because 1) 4 year olds have a non-existent attention span and 2) we don't want Toby to grow up spoiled or unaware of his privilege. Toby, like a lot of children, tends to get more play out of smaller items than he does a big ol' roarin', chuggin', loud gadget. (Seriously... this is the kid who carried around the bottom half of Mike's phone case for weeks pretending it was some sort of Samurizer or something.) We thought this was the perfect way to ease into Christmas and treat him for all of December, all the while going easy under the tree. Everything we included in his advent would be suitable for a child's stocking. We spent less than $30 on the whole advent calendar! Of course some of the activities will require extra purchases (movie tickets, etc), but you're able to pick and choose as you please if you decide to set one up for your kiddos! 

It's hard to believe Sunday will already be the 1st of December... and since this is so last minute, I'm sharing our Advent Activities with you in case you want to whip up your own version before the end of the weekend! Here are the activities we laid out for Toby:
  • Make popcorn garland for the Christmas tree
  • Go through our toys and donate to a local food bank
  • Make DIY ornaments (Dollar Tree has a great faux stained glass set for kids! $1)
  • Make gifts for Toby's pre-K teachers
  • Attend the local Christmas parade
  • Send Santa a letter
  • Make hot cocoa
  • Visit Santa
  • Invite family over for dinner/cake (Toby's birthday!)
  • Make a gift for dad (with help from Mom)
  • Make our own holiday cards (Target has a DIY card kit for kids for $1)
  • Make little favors for Toby's class party
  • Watch The Grinch Who Stole Christmas (Toby's favorite movie)
  • Make a 2013 ornament (I'll share that on the blog!)
  • Go see a holiday movie in theaters (Frozen!)
  • Make/Paint/Create gifts for others (grandparents, especially)
  • Make homemade dog treats for Pip + Georgia (+ the cats, too)
  • Bake cookies to give to family and friends
  • Make a gift for mom (with help from Dad)
  • Wrap presents to put under the tree (gifts for grandparents/aunts/etc)
  • Do at least one random act of kindness (but shoot for 5!)
  • Make a gingerbread house (we put this on a card with a clue for Toby to find the hidden kit)
  • Hop in the car in our PJs and go look at Christmas lights together
  • Bake Santa a fresh batch of cookies (and put out carrots for the reindeer!)
  • Give/receive gifts with a grateful heart
Overall I am so excited for December! I know it'll be a lot of work to get all of these done, and there may be some days where we have to move things around or adjust to life's plans, but I can't wait. Toby told us in a very matter-of-fact tone the other night that he knew Santa wasn't real... his 7 year old cousin told him that guys just put on costumes and pretended. He wasn't upset, but my heart broke into a million pieces. I want so badly for him to believe. I want the magic of Christmas to stay alive for a few more years... so we've got some plans in the works. We'll make a believer out of him! Even if he chooses to remain skeptical, I know he'll truly love the advent calendar and all of the fun activities we have planned together.

Do you do anything like this with your kids? I'd love to hear how it's worked for you in the past! If you have any great activities or charitable suggestions to add to next year's list, that'd be great! I can't wait until he's old enough to volunteer somewhere (and actually be of service).

Handmade Activity Advent Calendar - DIY - Kaelah Bee

Friday, 1 November 2013

// A Halfway Homemade Halloween

Toby's Halloween - KaelahBee.com
Halloween with a 4 year old is pretty intense. Last year was super laid back and we spent a few hours trick or treating, but this year was pretty bonkers. Toby had a Halloween party in his Pre-K class yesterday and we had to bring/make something for him to share with the class. Of course we took the required bag of candy, but I was feeling extra festive so we nabbed some Halloween-appropriate plates/napkins/etc for the party. Then I also decided to make cake pops. Okay, so I know cake pops are "so 2008" but eyeball and pumpkin cake pops for a party?! That'd be so fun! Naturally like most other kitchen endeavors, I severely overestimated my skill and ability haha! We made cake pops for the holidays 2 years ago and we swore we'd never make them again. The chocolate dipping is bane of my existence and I'm not even going to admit how many batches we ruined (and are currently trying to melt out of our nice pans). They weren't perfect, but surely they'd do... then I had to walk with them to his class in the rain... because the gel never set. So they were totally smeared and gross looking by the time we got to his classroom... but luckily the kids still ate them. They were red velvet and cream cheese pops... and they were delicious. Hopefully the 4 year olds didn't judge me too harshly... yikes!
Toby's Halloween - KaelahBee.com
After his party was over we started to venture home. I realized that we had yet to find Toby the perfect TMNT costume. (He wanted to be a Ninja Turtle, but then saw a Power Ranger costume and decided to get that. Then my parents surprised him with a big ol' TMNT shell + sword so then he changed his mind again... Naturally. haha) All of the costumes we could find were far too big. In a last ditch effort to make something appropriate, we headed over to Walmart. We picked up a little green long sleeve shirt and a yellow polo that was on clearance. I had no clue how I'd do it, but we went home and I started cutting. Luckily what we ended up with was actually kind of perfect. Toby already had a bright green! pair of jeans from H&M, so all I needed to do was fashion the front of the shirt. Toby had a TMNT mask but it was too big for his face, so I just whipped up a little two-ply red one and attached it to an elastic headband. I also made a little belt out of felt to put on the shirt, too. I made sure to cut up the sides of the shirt so I could sew everything easily, and so I could also take it in a few inches so it'd fit. In the end it worked out perfectly! The shirt was the perfect length, but also a nice, slim fit. And he was in heaven. The weather was so bad last night. We had a tornado watch for most of the evening. Luckily there was a break in the rain long enough for us to take him to about ~a dozen houses or so. We promised him we'd take him to the next town over tonight since they moved their Halloween to Friday. 
Toby's Halloween - KaelahBee.com
Ever since Toby came along I feel this insane desire to be some kind of "super mom." That sounds like a load of crap when I think about how I fail so often, but it's true. I think it's easy to beat yourself up over what you should/could/would have done in every instance of every day, and a lot of times I do just that. It's hard to feel like you're "enough" when you feel like your child deserves the world. I don't know, maybe that's silly. I see these opportunities to do something amazing for Toby and I want to take them all. And then they often fall a little flat or don't quite turn out the way I had hoped. I know that doesn't make me a bad mom (duh!), but sometimes I wish I could just knock one out of the park, ya know? Luckily I have his whole life, right? haha I know that at the end of the day it'll be more about the memories we made than the perfect execution of the cake pops when he was 4 years old. But gosh darnit I just want to make the perfect cake pops, okay! - To be honest, I've wanted to DIY his Halloween costume all along, but felt intimidated by the store bought ones he was always asking for. I'd love to whip up fun DIY costumes for all of us, each year, but I also never wanted to force that on Toby, if that makes sense. While it may have only be an $8, 1 hour DIY job, I'm pretty tickled with the result and knowing that he is too totally makes my heart swell. I guess that was a pretty good compromise, right? And at least he can totally wear his TMNT shirt with regular jeans and feel awesome the whole day. 
Toby's Halloween - KaelahBee.com
With all of that being said, I'm excited to see how our future Halloweens pan out. Maybe we'll make it a family tradition to DIY our costumes each year (or at least go the "halfway homemade" route). Maybe we'll get better at not procrastinating. Maybe we'll just be a disorganized mess each and every year.... Whatever the case may be, I'm glad I get to spend these messy, disorganized days with my two favorite fellas. Today I'm going to pour me a cup of coffee (or three) and enjoy the view from our front porch. Isn't it nice? I'm heartbroken that all of those gorgeous yellow leaves will be on the ground in less than a week. Autumn, I wish you'd stick around a little bit longer. xo

PS; Truth bomb - When I first started sewing Toby's t-shirt, I totally sewed the front and back together. Yeah... I did that. We can't all be winners, right?!

Tuesday, 22 October 2013

// 18 Easy Halloween Snacks For Kids + Parties

Halloween Snack Ideas for Kids and Parties - KaelahBee.com
If you're a parent of a young'n, chances are likely that a Halloween party is in your very near future. I've been brainstorming what I wanted to whip up for Toby's Pre-K party next Thursday, but feeling a little uninspired. What's a mom to do in that situation? Pinterest. Sometimes Pinterest overwhelms me, but I'd be lying if I said I didn't love it. I spent part of last night scouring the site for some inspiration and I picked 18 of my favorite kid friendly ideas!

I tried keeping it peanut-free since peanut allergies are so common. There are a few dairy-free options, too, as well as ideas that lean a bit healthier than others. I'm still not totally sure what I'll be doing for Toby's party, but I'm hoping it's: quick, simple, can be made the night before, and is easy to distribute. 4 year olds are pretty messy by nature... so those rice krispie snacks are looking good... But boy oh boy they're sticky!

Here are the 18 ideas I liked (clockwise):

Any other fab ideas you want to toss into the ring? This girl is all ears! Happy Tuesday!

Tuesday, 8 October 2013

// DIY Geometric Paint + Glitter Wall

Kaelah Bee : Office Makeover - Geometric Glitter Wall DIY
Okay! I'm so stoked on how excited y'all were about our geometric glitter wall! Seriously I've been dying to share this project since we did it and it's so easy! I think everyone should have a glitter wall in their house but I'm obviously super biased so whatever. Let's talk about a few things first, yeah?

Before you dive head first into adhering glitter to your walls, ask yourself these questions:
  1. Are you the type of person who will go bonkers if you have glitter stuck to you after 3 days/showers?
  2. Does the thought of finding more glitter in your bra than on the wall freak you out?
  3. Does the room you want the glitter wall in have carpet?

If you answered yes to any of those questions, you might be best just sticking to the geometric flat paint or opting for a glitter paint (Martha Stewart has one!). You can get around #3 by laying down a slick dropcloth (don't do a canvas/fabric one!) but seriously, don't blame me if you're stuck with glitter in your carpet forever! That's my disclaimer! Real glitter ends up looking so much better than a glitter paint in my opinion.

But really, you will find glitter everywhere. In your bra. In your hair. On your eyelids. And quite possibly your underwear. I don't know how it got there either. Maybe wear a turtleneck if it gives you the heebie jeebies. Picking tiny pieces of glitter off of yourself for a week is so worth it! I promise.

Okay... now the part you've been waiting for! Let's get geometric!
Office Makeover DIY Geometric Glitter Wall - KaelahBee.com
I was totally serious when I said this wall cost us around $15. Granted we had the glitter and ModPodge already, but it doesn't take much at all. We painted an 8x11' wall and had plenty of paint leftover afterward. We picked a Valspar paint swatch with 3 colors on it and just had the lady at Lowes mix up a sample size ($3!) of each color. We knew these shades would work well together since they came from the same swatch card. (Our colors are: Baby Blush, Peach Whisper, and Peach Punch)

SUPPLIES:
Satin finish paint in the colors of your choosing (we used 3 colors + a metallic spray paint)
ModPodge (Gloss)
Glitter
Foam brush
Aluminum pie plate (or paper plate)
Frogtape (we used .94")

INSTRUCTIONS:
Get crazy with your Frogtape! Whatever shapes and lines you want, slap that sticky stuff on! We had no rhyme or reason to our design, but we started with larger diagonal lines and then just built off of them. To be honest it's sort of a blind project where you have no idea how it'll turn out until it's done. We were skeptical, too, but now we are believers!

Once you've laid your Frogtape down, decide what color will be your "median" color and paint those first. We painted our medium pink to start, then we painted the lighter and darker shade at the same time. We just eyeballed what we thought would look good and went for it. You can always fill "holes" with the median color, too. You'll start to see how it all works together once you get 2/3 of your wall painted.

Our photos are a little out of order considering we opted to do gold spray paint on a few shapes first. The metallic paint fell a little flat for us so that's where the glitter came in. If you want to do the spray paint, just be sure to cover up the shapes around it with paper first. The smell of spray paint in your home should be enough to make you not want to do it, but hey, it's a lesson learned! All ideas can't be good ideas, right?

Be sure to pull off the Frogtape about 10-15 minutes after you finish the last color. This way the paint is still a little pliable if you need to fix it a bit. The Frogtape did a good job for us but there were a few small spots we needed to touch up afterward.

Let your paint dry for several hours before attempting the glitter portion. It gets messy and you don't want the glitter falling into the other colors.

NOW! THE GLITTER! (Sweep your floor if you have hardwood! This way you can just sweep up the glitter and reuse it if needed) Grab some more Frogtape and tape around the shapes you want glittered. It worked out well for us because our base was also gold so it didn't matter if the coverage wasn't even. If you can, I recommend matching the base paint and glitter, but it's not the end of the world if you don't! Now, dip your foam brush in the ModPodge and give your wall shape a good coating of it. Not super thin, but also not so thick that it's runny. As soon as you do the ModPodge on one shape, dump some glitter in your pie plate and fold it up a little bit. (You don't have to fold it like I did, but I noticed it made a huge difference in the coverage on the wall!) Start at the bottom of your shape and blow the glitter onto the wall, moving side to side and upwards. You'll have to do it a couple of times for each shape, but don't worry, it's amazing how much it'll cover! Repeat as necessary on the amount of shapes you want and voila! Remove the Frogtape and you have you a fancy, sparkly, glittered wall!
Office Makeover DIY Geometric Glitter Wall - Kaelah Bee
Kaelah Bee : Office Makeover - Geometric Glitter Wall DIY
Hopefully that was easy enough to follow! I know many of you expressed your excitement at making a geometric glitter wall of your own. I've read so many awesome color palette ideas! I think the mint ombre + silver might be my favorite! (Well, second to my own of course haha!) Mike and I said that if we ever have a little boy we're totally going to do this with a grey wall. (And if we have a girl then voila! We've already got part of the nursery done! Dreaming way ahead there...!) Let me know if you end up giving it a go. I'd love to see some shots of your own walls! Good luck! xo


©2009 Media Jelek | by TNB