Showing posts with label how to. Show all posts

Monday, 1 December 2014

// DIY "Get Cozy" Gift Basket


Gift baskets are one of my absolute favorite things to give people as gifts. You can make a gift basket out of anything and with any theme. I love that! It's a great way to squeeze in a lot of special little treats for a variety of people, too. For the Michaels Makers December challenge, we were tasked with coming up with a DIY gift and showing how we'd wrap it. Well, my basket isn't really "wrapped" but I like to think that it's more about the presentation than actual wrapping.

This is my "Get Cozy" Christmas basket! It's overflowing with hot beverages to suit any taste. Coffees, teas, and cocoas, too! Since there are a lot of family "clusters" at our Christmases, this is the perfect solution for gifting something for everyone, without spending a fortune and without needing to get too specific. 

I included a bevy of goodies in this basket. Everything from whole bean coffee, chocolate covered espresso beans, tea (loose leaf, sachets, bags), a few different hot cocoa mixes, some fun neon cocoa marshmallows, local honey, and DIY coffee syrup (caramel!) The coffee syrup is great becasue you can get so many servings out of one little batch. I tossed in a fun tea towel, box of caramel chocolates, and some tea bags for the loose leaf tea, also. The basket itself is a galvanized tin from Michaels and I just added some floral foam to fill it out a bit before adding a cozy blanket. I used a variety of glass jars from Michaels to hold some of the goodies in the box. (These remained water-tight for me since they were standing up - If you decide to spend a basket like this in the mail, you might want to try a different type of jar just to ensure they don't leak in transit!)


You can get super creative and add chalkboard labels, or even add a bit of chalkboard paint to the front of the jars to highlight what each item is. I had planned on adding some pie boxes filled with some ooey gooey pie we made for Thanksgiving, but uh... we sort of ate it all haha! 

I definitely plan on giving a bunch of gift baskets again this year. Filled with treats like this, homemade banana bread, DIY/handmade trinkets, etc. There's just something so fun about gift baskets! Giving and receiving them is so awesome. It's like a gift that just keeps on giving, ya know?

-----------------------------------------------

If you're still mulling over what to give your loved ones this year, check out the holiday gift guide from Michaels. If you didn't catch our dream tree reveal or tree decorating tips, be sure to check those out, too! And finally, if you're in the crafty mood and want to give the gift of a homemade trinket, check out the DIY gift projects on the Michaels Pinterest page! My fellow Michaels Makers are sharing their own DIY gifts and wrappings below, too. Inspiration overload!

Are you a gift basket type of person? What type/theme basket would be your ultimate favorite to receive? I might need to share a few more of the ones I end up making! xo

Tuesday, 17 June 2014

// Bunny Ear Baby Teether DIY


The nesting instinct has kicked in full throttle as of late, and I've been trying to be as productive as I can on all ends of the spectrum. I've been perusing Etsy lately looking for unique toys for the nursery and I stumbled upon some cloth teething rings. They looked so incredibly simple to make so I thought I'd give it a go. Even though Baby Flynn won't be using these for quite some time, I wanted to get a head start on some simple DIYs because who knows if I'll even be up to thinking about doing them once he's here. These are seriously so easy to do and they take about 5 minutes each (if that!)... and the best part? They're so cheap to make! Since they take such little amounts of fabric I've been tearing through my scraps to make some and even sending them to a few friends who are expecting. I love that I can just toss the fabric part in the wash and scrub the wooden rings with some soap and water in order for them to be good as new again.

SUPPLIES:

+ Sewing maching
+ 1/4 yd. fabric (organic cotton is great for this!)
+ Wooden teething rings (I bought mine on Etsy)
+ Thread
+ Scissors
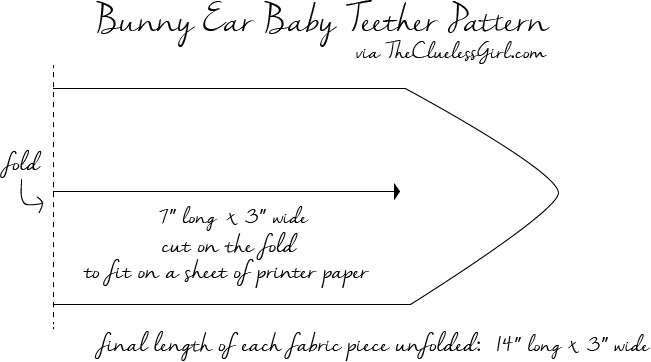
+ This handy template (Optional. I printed mine on 8.5x11" cardstock + cut on the fold)*


INSTRUCTIONS:

Step One: Since I only had 8.5x11" cardstock available at home, I opted to print my template* at 100%, but "in half" so I could cut on the fold. (Do not scale the image to fit your paper - If the template gives you trouble,  just cut a 14" x 3" rectangle [or 7" x 3" on the fold like I did] and shape the ends however you prefer!) Because my paper was smaller than my template, I just doubled over my fabric and made sure the short end of my pattern piece was on the fold. Since I had really sharp scissors I was actually able to cut both pattern pieces at the same time (Your fabric should be 4 layers thick to do this!) This way I ended up with 2 perfectly uniform 14x3" pieces of cut fabric. Win/win!

Step Two: I placed the wrong sides of the fabric together and started my stitch in the middle of the longest side. I used a 1/4" seam allowance. I sewed all of the sides together, but left a 1" opening in the middle of the longest side so I could turn my fabric piece right side out. Once I had the fabric right side out, I poked the seam so it'd be flat and then I ironed the whole thing. This makes it easier to sew up the little gap. You can choose to do a slip-stitch or you can keep it simple by just running a topstitch around the entire fabric piece.

Step Three: After the fabric piece is sewn, fold it in half and slip it through one side of the wooden ring. Then take the "bunny ears" and loop them through the center part of the ring. Once you pull tight your teether will start taking shape. You can iron the bunny ears of your teether one last time to make them nice and crisp looking. Voila! You have a teether! Told you it was simple...


I opted to do a fatter, rounder top on the mint polka dot teether and I love how cute they all look together. I wish I had ordered more wooden rings but now that I know how simple it is to make these, I plan on cranking them out like crazy! They make the perfect little "happy" for babies of friends and family. And since they're so inexpensive and easy to make, I won't be heartbroken when they inevitably get lost.

Let me know if you decide to give it a whirl! I'd love to see what you come up with (and the fabrics you choose!) Happy Tuesday! xo

* I used the full/original template in my photos, but opted to upload a smaller version to cut on the fold so you don't have to mess with your printer's cropping settings! If you have any questions about the template, please leave them below! You can just wing it with a 14" x 3" cut if you prefer!

Wednesday, 21 May 2014

// End of the Year + DIY Teacher Appreciation Gifts


Yesterday was Toby's last day in pre-K. What?! I remember his very first day like it just happened... in his khaki shorts and his plaid shirt, toting that shark backpack like a boss. It's so crazy to think that was just 9 months ago, but now he's this little man, ya know? I'm so so glad we put him in the program because it has made a world of difference in his demeanor. From how he interacts with people to the knowledge he's gained.... he's a totally different kid. I'm sure that's just the nature of the beast, with kids growing up at what feels like a rapid rate, but I know going to school a year early has impacted him for the better. Toby had two amazing teachers this year and I've grown to adore them so much. Their kindness and consideration for him and their other students knows no bounds. We wanted to do a little something special for them to say thanks, so last night Toby and I painted these terra cotta pots to give to them before his final program today.

I seriously have tears in my eyes writing this... and part of me isn't 100% sure if it's because I'm so floored at how quickly he's growing up, or because he will officially be home 24/7 starting at 11am today haha! Kidding! (Kind of...) The balancing act of being pregnant, a work at home mom, and having a full-time 5 year old at home is about to begin! (I'm terrified!) But really, I've also just been incredibly hormonal so the occasional crying sesh on the way to school may or may not have happened... He's going to be in kindergarten in just a few months! What in the world?! Ah, anyway, enough of that. It's probably only shocking to me haha
I had seen some similar DIY teacher gifts on Pinterest at the beginning of the year, but I never really found who did it first. There's not really anything to it, as I'm sure you can tell. You just take a terra cotta pot, some paint, and then you do that! Haha I didn't photograph the steps because there's seriously no point. I just used whatever I had on hand. The top is acrylic paint and the bottom is chalkboard. Then I used Sharpies for the ruler portion (because no one in our town sells paint pens?!) and acrylic paint for the letters. I let Toby write his name on the back of the pots and I just went over it to make it a bit thicker and uniform. We chose to add in some marigolds since the school colors are black and gold. He handed them to his teachers when he went into school this morning and he looked so handsome in his little oxford shirt and cords. 

Today he has his final program at 10am and I'm counting down the minutes. He's been practicing his singing in the car lately and apparently one of the songs is a rap... and it's hilarious. They even beat box! Mike can't be there since he has such a strict school schedule, but I'll definitely be recording it on my phone so he can experience it, too.

Now I need to scramble to find Toby 2.5 months worth of activities to do so I can be productive while he's home every day! Wish me luck! xo

Wednesday, 14 May 2014

// Trump The Frump: 20 Ways To Beat A Bad Mood

Yesterday was a weird day. Everything just felt off since waking up. I had a sore throat, I was quick to temper, and no matter what I did, I just couldn't find it in myself to be productive. You know how it goes, right? I had hoped to come home from dropping Toby off at school and knock my to do list out of the park... Instead I moped on the couch, took a 1.5 hour nap, and finished season one of Orphan Black. It wasn't one for the books, I'll tell ya. Nothing was particularly wrong, but I just felt like I was off my game. Now I'm not one to think it's bad to have those days. In fact, I know their importance in the grand scheme of things. I'm not obsessed with the idea of making everything sunshine and unicorns all the time... but at the same time, I like to actively try to turn my days around. If I can salvage them, I want to. But yesterday just wasn't happening.

I started my day by polling my Instagram followers, asking for their tips and tricks on making the most of a rough start. I really loved all of the responses! Some were more helpful than others, but they each had merit. Many of them were pregnancy-centric so they may not be the most helpful for a wider audience, but I did manage to compile my own list while sprinkling some of their wisdom in.

Here are some ways to help beat a crappy mood:
  1. Document everything that makes you smile. Whether it's the perfect cup of coffee, a delectable brunch, or flowers on a sidewalk, take a moment to capture life's little rays of sunshine. (Bonus points if you share it with others! Post an Instagram of the moment to inspire someone else!)
  2. Take a cat nap. Try and wake up on the other side of things. Even 10 or 15 minutes can help reset your mood.
  3. Pay it forward. Pay for the purchase of the person behind you. This works great in a drive-thru setting so that it can be quick and almost-anonymous, but even if you're in a store or a restaurant, spreading the wealth can make you feel great, and it positively benefits another person, too!
  4. Greet every person you meet. Whether it's a simple "Good morning!" or a "How are you?," a little acknowledgement goes a long way. If you're too shy to speak, offer up a friendly smile while passing. You never know who might need that small gesture, and it feels awesome to have it reciprocated.
  5. Get some sunshine! 95% of my mood is based on how much sunshine (Vitamin D!) I get. Even closing the windows and doors in favor of the A/C dampens my demeanor. A few minutes of the sun's warmth will do you a world of good! (Just don't forget the SPF!)
  6. Say five things you're grateful for every hour until you break the funk. (via @morrisonlane)
  7. Turn on Pandora to your favorite station and give yourself a manicure. (via @meg_tini)
  8. Share something positive! Whether it's a quick tweet or telling someone your favorite affirmation, a little positivity goes a long way.
  9. Perform a random act of kindness. This can be anything! (Here are 350+ ideas to get you started!)
  10. Indulge in your favorite meal. Happy bellies mean happy minds, right? Or something... Even if your favorite treat is less-than-healthy, indulge a little! It's hard to be upset when you've satisfied a craving.
  11. Go for a run or get some exercise. Endorphins and serotonin for the win!
  12. Just sit for 2 full minutes... Don't move. Just be. (I'm a huge fan of this website!)
  13. Do something creative! Paint something for your home, sew something for your wardrobe, or create a gift for someone "just because." Channel your inner artist and create something interesting from the situation.
  14. Look through old pictures and reminisce. This is so easy with blogs, Facebook, Instagram, etc. Sometimes I just love to lay down and look through my camera roll on my phone. Remembering happy moments can make a huge difference in your mood!
  15. Create a mixtape or playlist to use any time you're feeling down in the dumps. A few of my favorite songs to listen to are: "Not Your Year" by The Weepies (it helps me feel all the feels!) and "Creepin' In" by Norah Jones and Dolly Parton (I just love their voices together!) Find what mix of songs helps do it for you. Whether upbeat or slow tempo, you'll find the magic balance.
  16. Plant something in your yard or garden. This will help you get some fresh air and sunshine (Hey #5!) and it'll help produce something beautiful down the road. How can you not smile when you see something grow from (almost) nothing?
  17. Google something random that you've been curious about before. I love getting lost in the Wikipedia rabbit hold. I sometimes Google something and find myself still reading about it 2 hours later... Not only does it distract me from a yucky mood, but it also helps me learn. Everyone loves to know random bits of information, right?
  18. Encourage someone. Jess does this SO well and I'm always so touched by her selflessness. I love that she gets her toddler son involved, too. She regularly crochets items for strangers and lets her son hand out flowers to strangers. It really falls in line with #9, but it's worth mentioning in it's own bullet point!
  19. Hide notes and positive affirmations all around town. In books at the library, on the mirrors in the fitting room, or in the pockets of clothing at the store... Little reminders that say things like "You are wonderful!" "You look great today!" etc. It may sound silly, but just imagine how lovely it would be to find something like that on a random day.
  20. Just feel all of the feels! Be sad, or upset, or bored, or whatever... Just feel what you're feeling. You can think about it and dissect it, or you can just be. Allow the mood to move through you so you can then move on. There's nothing wrong with sacrificing yourself to an overwhelming mood. Yesterday I needed that "off" day... I needed to just "be" and watch tv. Sure, I didn't get much done, but I felt better because I just allowed myself to be.
What are some of your favorite ways to break the funk?

Tuesday, 29 April 2014

// Dating Yourself (+10 Cheap and Easy Ideas!)


What's the last, nice thing you did for yourself "just because" you deserved it? Last week I decided I wanted something to brighten up my living room so I bought myself flowers. Just a cheap, $5 bouquet of pink florals, but that little bouquet made a world of difference. I enjoyed trimming the stems and preparing my vase once I got home. I allowed myself 10 or 15 minutes to just experience the process. And when I found a little home for them on our entertainment center, I snapped a quick photo to share my own personal sunshine online. Maybe that sounds like a weird way to go about things, but that small, tiny gift to myself improved my mood tenfold that day. And I wanted to share that with others to inspire them to treat themselves! I realized that I deserved those flowers and I didn't need to wait around for anyone to buy them for me. Don't get me wrong, Mike used to shower me with flowers on the regular, and now he'll still surprise me every once and again. But why should I wait for someone else to give them to me? Fresh flowers make me so happy, and I owe it to myself to be inspired while I live and work. And so do you!

Maybe your last gift to yourself was a manicure (either in a salon or at home!), a new book, or even a long, uninterrupted bath. We don't have to shower ourselves with grand gestures or elaborate gifts... sometimes something so small can make such a difference. Sometimes we have to supply our own sunshine in life.

Here are a few cheap and easy ways to date yourself!

  1. Enjoy a long, relaxing bath. Maybe throw in some bath bombs or bubbles, and light some candles to set the mood. Bonus points if you treat yourself to a glass of wine, too!
  2. Spend some time giving yourself a fresh new manicure! Try a new color or get artsy with some DIY designs.
  3. Cook yourself a nice meal! Whether you have a household to feed or just yourself, spending time trying a new recipe that just sounds delicious can be a great treat!
  4. Browse your local library, bookstore or even Amazon for a new-to-you book to read. Get lost for a few hours. Don't feel guilty if it's a cheeky chick-lit book! (Those are my favorite!)
  5. Write yourself a little love letter or pep talk. Kara did a really cool version of this and I love the outcome! You can always go back to it when you need a boost!
  6. Buy yourself some flowers! This is obviously my favorite way to treat myself because I feel like it really adds to my environment. There's something so dreamy about fresh flowers! You can even pick them from the side of the road.
  7. Treat yourself to a matinee movie date! Is there a film you've been wanting to see? Go! Why not right?! I love settling in for a movie with my own popcorn and drink. It's such a great 90-minute escape from the daily grind.
  8. Learn a new skill or hobby! Workshops and classes are all over the place these days! Both online and off, it's so easy to find a class that helps you learn a new skill. Everything from weaving to jewelry design and sewing, and even things like web coding... This "date" is a great way to invest in your interests and your future. You might even find a new passion!
  9. Go to your local animal shelter and spend some time with the animals. You can volunteer to walk the dogs, feed the cats, etc. Not only will you be making the day of the animals in the shelter, but you'll also get those warm fuzzy feelings from being surrounded by precious little furry friends.
  10. Have a little impromptu photoshoot with yourself! Maybe this one sounds silly and self-indulgent, but just think about how good a new, gorgeous profile photo makes you feel! Find your favorite outfit, throw on some lipstick (if that's your kind of thing), and snap some selfies! Celebrate your beauty and set the tone for your online presence.
Whatever you do this week, just remember to date yourself! Treat yourself kindly and enjoy the little things. Don't wait for someone else to do it. 

What's your favorite way to "date" yourself? Today I'm going to spend time giving myself a mani/pedi, and maybe later this week I'll take myself on a froyo date. Why not, right?!

Friday, 3 January 2014

// How To Tip Toe Through A Rebrand In 8 Easy Steps

How to Rebrand your blog in 8 steps
One of the things I knew I wanted to talk about after my relaunch was the how, why, and when. I've received several comments, emails, and inquiries over the past couple of days from eager gals seeking advice on how to push through a reinvention of their own, so hopefully this post will prove useful to some of you! I'm not a business expert, and I'll never claim to be, but I can obviously speak from my own experience. Sometimes that's exactly what we need: the experience of another average human rather than a robotic checklist of things to do. Hopefully I can pare this one down, because the first draft was about fifty paragraphs too long. Brevity isn't my strong suit!
How to Rebrand your blog in 8 steps
In order to reinvent anything, you first have to determine what exactly isn't functioning at full capacity anymore. Whether you're looking to "rebrand" your blog, your business, your personal style, or your "life," you first have to get very honest with yourself. For me, I wasn't motivated by my blog anymore. I'm not sure when the switch flipped, but it did. I didn't really mind going several days without a post, when before you'd be hard pressed to find two days in a row that I didn't write. It was really really hard to pinpoint exactly what wasn't working for me any longer, and to be totally honest, I'm still not sure I've found it. Still, I knew that the name and the look no longer served me. I wanted to sort of free myself from those constricting elements, but that was a scary thought.

Little Chief Honeybee grew from nothing into something over the past five years. I've had products named after my blog, and countless interviews and features that will forever display the previous name. Walking away from that was like walking away from my childhood, ya know? I knew it had to be done, but I was terrified. My compromise: rebranding this blog on this platform. Rather than starting new (at zero!) on a new platform, I wanted to try and make this work. Will it be the best decision in the long run? Who knows. It's all trial and error anyway

How to Rebrand your blog in 8 steps
Brainstorming for the new blog launch was exhausting. Some days it was so hard to write on Little Chief Honeybee because I just didn't want to. I wanted something new! Something fresh! But it just wasn't coming to me. I started my rebranding process the way many do - on Pinterest. I had a secret board that I built into a comprehensive moodboard, full of my favorite colors, photos that gave me a sense of what I was hoping to achieve, and type stylings that I really liked. I even pinned loads of great editorial layouts that I thought might serve me well. Ultimately 85% of the moodboard went out the window, but I was only able to get to that point because I spent an exhausting amount of time dreaming it up. Overthinking isn't necessarily a good thing, but you should make sure you invest enough time and energy into the thought process before you start actually building anything.

How to Rebrand your blog in 8 steps
This rebrand has been in motion for nearly a year. I knew at the beginning of 2013 that I wanted something new and fresh, but I didn't know how to go about getting there. It's easy to know you want change, but it's hard to decide what you'd be willing to risk it all for. It wasn't until the Summer that I came up with the name. (Loads of you simply don't "get" the name, and that's okay! You'd think explaining something that makes total sense to you would be simple, but sometimes I find it hard to put into words.) When I came up with it, that was that. There was little to no discussion in my head... I just knew. The design? That didn't come so easily. In fact, I sat on my hands for months trying to dream up the design, but was left feeling frustrated and let down. One day I just had to sit down at my computer and start laying things out. Before too long, things started taking shape.

I'm really happy with the final outcome, and I think part of that is because I took my time doing it. Rebranding and reinventing something is not to be taken lightly. If you're putting forth the effort to do something, you want to do it right. And chances are highly likely that you are passionate about that thing you're redoing. Otherwise why waste your time? If you want to ensure you don't end up in the same space again, build it slowly. Be intentional with each and every piece of the puzzle.

How to Rebrand your blog in 8 steps
Don't be offended when everyone doesn't "get it" - and don't be surprised. In fact, some people will lack the ability to grasp it so much that they'll be angry at you for the change. They'll chastise you and maybe even go as far to email you and tell you that you owe them something. They want the old you, the old blog, the old looks... whatever. Not everyone is as open to change as you are, and you also have to remember that your audience is on the outside looking in. They may not realize just how debilitating your current brand is to your creativity. They'll pick apart the pieces that don't make sense to them rather than see it as a whole. That's okay. It's natural. Don't let it discourage you. 

How to Rebrand your blog in 8 stepsPlenty of people have a hard time accepting change. When you take the first steps to drastically change something, folks are going to get restless. They'll get nervous that you're changing everything and they'd rather just abandon ship. Let them go. Just like we grow out of our look/style or "favorites" over time, our readers also grow out of us. I regularly drop blogs from my Bloglovin because I feel like they just don't resonate with me anymore. There's no animosity there... just different strokes. I went one way and they went another.

If it feels right to you, do it. I would never go as far to say we don't owe anything to our readers (obviously y'all are the reason I'm able to do this to a certain degree, so thank you), but sometimes we have to be okay with letting some readers go in order to gain new ones. Some simply won't get the rebrand, and they'll leave (with or without a fight). And you'll have plenty who will stick around but second guess your direction/motive/etc. Make them believers. Show them you're still someone who can be trusted. You're the you they have grown to know. We're all human, we all evolve. Show them the You 2.0. Make them realize they were missing something all along... something they never even knew existed. Be you, but better.

How to Rebrand your blog in 8 steps
Don't second guess yourself. Move forward with what feels right to YOU. There will be naysayers who think your content is juvenile, or maybe too far out of your realm of expertise. Do you. Write what you know/like/love/want. Wear bows in you're hair if you want to (regardless of your age). Don't be afraid to make a statement, even if others disagree or try to call you on it. 

Negative and neutral (and sometimes even positive) feedback doesn't need to be personal! It's not always about YOU. Especially when you're creating some kind of creative product to share with the public. (And yes, a blog is exactly that.,. A product you CREATE). If you find it particularly hard to digest the less than stellar reviews, ask a friend to moderate those sorts of things, and avoid places where they may be breeding. If at all possible, read your criticisms objectively! We can ALL improve. Some will be constructive, and we should always be eager and willing to learn something. Malicious criticism has no merit in any situation so try to let that roll off of you. Malicious crit is NEVER about you.

How to rebrand your blog in 8 steps
It's so easy to be overly protective of our creative work. Making a huge change isn't easy, and sometimes we can let our minds play tricks on us. We can psyche ourselves out and develop anxiety about following through with it. One of the most common things I see folks doing is trying to over-prepare themselves for the upcoming change. It's human nature to want to be ready, but we also have to acknowledge that we'll likely never be as prepared as we'd like. Rather than spend forever trying to psyche yourself up to hit "publish," just go for it. Jump!

Plan as much as you can, sure. But if you find yourself slightly stuck and bummed that your editorial plan didn't come as far as you had hoped, throw caution to the wind and go for it anyway. It's okay for the pieces to fall together later. In fact, bring a little but scrappy about it might actually help motivate you. (But I'm biased because this is me 99.9999% of the time). There's no shame in putting yourself in the position to get stuff done. Sometimes the comfort and security of our "secret" can hinder us from taking that very important step.

How to rebrand your blog in 8 steps
Above all, be genuine. Be authentic. If you feel nervous, talk about it! Just don't let the fear keep you from reaffirming your love for whatever it is you're doing. This goes so far beyond blogs. Maybe you're feeling the need to switch things up with your style of career or whatever. Big or small, the trick remains the same: be true to you.

Make your motives known. One key component to trust is transparency. What fueled your rebrand? Appealing to advertisers? Simply wanting a more honest space? What was it? For me, I felt stuck in a name/space I didn't resonate with. My blog name was my Myspace name when I was 19. While it had certain personal significance at the time, it was simply a poor reflection of me now. I didn't do it to attract sponsors or because I want to write a book. And I didn't do it because I want to be some small biz guru (Please! I have so much to learn.) I simply did it because it felt like it was time. 2014 will be a year of big decisions, I can already feel it. But I also wanted a space where I could share resourceful information. I don't want this space to go dead when I get tired of talking about my life (because I will. And you'll grow tired of reading about it, too). The name doesn't make sense to many of you, and that's okay. If that has to be the reason you stop following, I'll be sad to see you go, and I'll wave you off with a grateful grin (cheesy!). But the name makes sense to me. It feels good, and it felt perfect when I thought of it. I love to "teach" and share information/advice. I love to share what I've learned with others in hopes that it will inspire them to work harder, dream bigger, and be better. While I could certainly use a daily dose of all that myself, I like knowing I'm "helping" in some small way. What's the saying? "A candle loses nothing by lighting another candle?" That's my hope for this blog. Maybe it's lofty and misguided, or maybe I'm putting too much stock in my abilities/reach, but I'm doing it anyway. 

It's so easy to misinterpret things on the internet. I hate feeling like someone has simply missed my point or failed to understand my tone or intention. This blog post serves double duty: sharing my experience and advice for a potentially scary rebrand (of whatever!) and addressing concerns folks have had. Even if one person expresses their concern or confusion about something, there certainly have to be many more out there with the same thoughts, right?

With that, I thank not only those of you who have eagerly followed me into the new realm of this blog, but also those of you who have questioned me (even if indirectly). Those questions help me better understand how I'm delivering all of this information to you... Whether personal or professional. I can always stand to learn a thing or two!

Even if you only give me five minutes of your day... heck, five minutes of your week, it adds up. Just imagine five minutes for each and every reader, combined.., that's a big responsibility. I think it's so easy to miss just how big of a deal that is. That's why it frustrates me so much to see so many bloggers be blatantly lazy and dismissive with their time/instructions/advice. I'm certainly not trying to claim that I'm somehow better (I fail in many ways on many occasions, I'll be the first to admit), but I value you and your time. I don't want to give you shoddy advice or shoddy directions. So many blogs coast solely on their readers' loyalty, and it's not fair. I may not owe you a play by play of my private life, but I at least owe you the common courtesy of honesty. I think several blogs really miss out on that. Authenticity and transparency equal trust. No matter what your "rebrand" is... your life, your business, your blog, your style... be authentic!

LCH was hard to leave because of everything attached to it, but it just wasn't consistent. LCH, Honeybee in the City, KaelahBee, it was all too much. I needed one set name. The name held significance at one point but eventually became a parody if itself. So much so I couldn't even tell people my blog was called Little Chief Honeybee?! What the heck does that even mean?! By the end of it I would just say it was a silly myspace name rather than explain why it had much more significance. Still, even so, I'm glad it's retired. 

This is the Me 2.0. And for the sake of transparency, I have no idea what I'm doing. I have a few features "planned" but nothing set in stone. My hope was to have the full first month finished by the time I launched... I didn't even have the first post. Sometimes things don't work out the way we had hoped, and that's alright. We adapt and move on. I'm hoping things will fall into place as the days pass. I guess we'll see!

If you're hoping to reinvent some area of your life, go for it! Life is far too short to be unhappy with any aspect of our lives. This very thought has spawned many important conversations in our house and I'm excited to see how 2014 pans out. If you'd ever like to chat about how to make your reinvention happen, I'm all ears! Happy Friday, friends. xo


Friday, 29 November 2013

// DIY Advent Calendar + Activity Ideas (Perfect for Kids!)

DIY Advent Calendar and Activity Ideas for Kids
When it comes to holiday traditions, I really wanted to try and set some in place for Toby as he grows older. I don't want to dictate what will or will not become a tradition, because that's a little weird (right? Just me?), but I'm hoping this one will stick. Who knows if it'll even be successful! Despite the fact that we're not a religious family, I wanted to do an advent calendar of sorts for Toby so he could experience the magic that is the holiday season. I wasn't sure how to balance the little treats and learning actual lessons, so we opted to do an activities-based calendar. Each day in December Toby will unwrap one of the little "treats" and there will also be a piece of paper with an activity on it. The treats are just meant to be little rewards for awesome behavior (and if we're being totally honest, something to tide him over until Christmas is actually here. Have you ever tried explaining time/dates to a 4 year old?!). The activities are meant to promote kindness, selflessness, and family memories. We have everything from "donate toys" to "ride around to look at christmas lights in our pjs". It's something he'll get to look forward to each day and I'm excited to play a part.
Handmade Activity Advent Calendar - DIY - Kaelah Bee
For our calendar we opted to use both wrapping paper and canvas tied up in twine to wrap his treats. I was super inspired by this pin and wanted to do something similar. I nabbed this perfect wrapping paper from Target because I loved that it wasn't holiday-specific. We grabbed a bunch of little trinkets, candy and art projects from the Target "Dollar Spot" bins, as well as a few toys from the Dollar Tree. We don't go crazy at Christmas in our house because 1) 4 year olds have a non-existent attention span and 2) we don't want Toby to grow up spoiled or unaware of his privilege. Toby, like a lot of children, tends to get more play out of smaller items than he does a big ol' roarin', chuggin', loud gadget. (Seriously... this is the kid who carried around the bottom half of Mike's phone case for weeks pretending it was some sort of Samurizer or something.) We thought this was the perfect way to ease into Christmas and treat him for all of December, all the while going easy under the tree. Everything we included in his advent would be suitable for a child's stocking. We spent less than $30 on the whole advent calendar! Of course some of the activities will require extra purchases (movie tickets, etc), but you're able to pick and choose as you please if you decide to set one up for your kiddos! 

It's hard to believe Sunday will already be the 1st of December... and since this is so last minute, I'm sharing our Advent Activities with you in case you want to whip up your own version before the end of the weekend! Here are the activities we laid out for Toby:
  • Make popcorn garland for the Christmas tree
  • Go through our toys and donate to a local food bank
  • Make DIY ornaments (Dollar Tree has a great faux stained glass set for kids! $1)
  • Make gifts for Toby's pre-K teachers
  • Attend the local Christmas parade
  • Send Santa a letter
  • Make hot cocoa
  • Visit Santa
  • Invite family over for dinner/cake (Toby's birthday!)
  • Make a gift for dad (with help from Mom)
  • Make our own holiday cards (Target has a DIY card kit for kids for $1)
  • Make little favors for Toby's class party
  • Watch The Grinch Who Stole Christmas (Toby's favorite movie)
  • Make a 2013 ornament (I'll share that on the blog!)
  • Go see a holiday movie in theaters (Frozen!)
  • Make/Paint/Create gifts for others (grandparents, especially)
  • Make homemade dog treats for Pip + Georgia (+ the cats, too)
  • Bake cookies to give to family and friends
  • Make a gift for mom (with help from Dad)
  • Wrap presents to put under the tree (gifts for grandparents/aunts/etc)
  • Do at least one random act of kindness (but shoot for 5!)
  • Make a gingerbread house (we put this on a card with a clue for Toby to find the hidden kit)
  • Hop in the car in our PJs and go look at Christmas lights together
  • Bake Santa a fresh batch of cookies (and put out carrots for the reindeer!)
  • Give/receive gifts with a grateful heart
Overall I am so excited for December! I know it'll be a lot of work to get all of these done, and there may be some days where we have to move things around or adjust to life's plans, but I can't wait. Toby told us in a very matter-of-fact tone the other night that he knew Santa wasn't real... his 7 year old cousin told him that guys just put on costumes and pretended. He wasn't upset, but my heart broke into a million pieces. I want so badly for him to believe. I want the magic of Christmas to stay alive for a few more years... so we've got some plans in the works. We'll make a believer out of him! Even if he chooses to remain skeptical, I know he'll truly love the advent calendar and all of the fun activities we have planned together.

Do you do anything like this with your kids? I'd love to hear how it's worked for you in the past! If you have any great activities or charitable suggestions to add to next year's list, that'd be great! I can't wait until he's old enough to volunteer somewhere (and actually be of service).

Handmade Activity Advent Calendar - DIY - Kaelah Bee

Tuesday, 8 October 2013

// DIY Geometric Paint + Glitter Wall

Kaelah Bee : Office Makeover - Geometric Glitter Wall DIY
Okay! I'm so stoked on how excited y'all were about our geometric glitter wall! Seriously I've been dying to share this project since we did it and it's so easy! I think everyone should have a glitter wall in their house but I'm obviously super biased so whatever. Let's talk about a few things first, yeah?

Before you dive head first into adhering glitter to your walls, ask yourself these questions:
  1. Are you the type of person who will go bonkers if you have glitter stuck to you after 3 days/showers?
  2. Does the thought of finding more glitter in your bra than on the wall freak you out?
  3. Does the room you want the glitter wall in have carpet?

If you answered yes to any of those questions, you might be best just sticking to the geometric flat paint or opting for a glitter paint (Martha Stewart has one!). You can get around #3 by laying down a slick dropcloth (don't do a canvas/fabric one!) but seriously, don't blame me if you're stuck with glitter in your carpet forever! That's my disclaimer! Real glitter ends up looking so much better than a glitter paint in my opinion.

But really, you will find glitter everywhere. In your bra. In your hair. On your eyelids. And quite possibly your underwear. I don't know how it got there either. Maybe wear a turtleneck if it gives you the heebie jeebies. Picking tiny pieces of glitter off of yourself for a week is so worth it! I promise.

Okay... now the part you've been waiting for! Let's get geometric!
Office Makeover DIY Geometric Glitter Wall - KaelahBee.com
I was totally serious when I said this wall cost us around $15. Granted we had the glitter and ModPodge already, but it doesn't take much at all. We painted an 8x11' wall and had plenty of paint leftover afterward. We picked a Valspar paint swatch with 3 colors on it and just had the lady at Lowes mix up a sample size ($3!) of each color. We knew these shades would work well together since they came from the same swatch card. (Our colors are: Baby Blush, Peach Whisper, and Peach Punch)

SUPPLIES:
Satin finish paint in the colors of your choosing (we used 3 colors + a metallic spray paint)
ModPodge (Gloss)
Glitter
Foam brush
Aluminum pie plate (or paper plate)
Frogtape (we used .94")

INSTRUCTIONS:
Get crazy with your Frogtape! Whatever shapes and lines you want, slap that sticky stuff on! We had no rhyme or reason to our design, but we started with larger diagonal lines and then just built off of them. To be honest it's sort of a blind project where you have no idea how it'll turn out until it's done. We were skeptical, too, but now we are believers!

Once you've laid your Frogtape down, decide what color will be your "median" color and paint those first. We painted our medium pink to start, then we painted the lighter and darker shade at the same time. We just eyeballed what we thought would look good and went for it. You can always fill "holes" with the median color, too. You'll start to see how it all works together once you get 2/3 of your wall painted.

Our photos are a little out of order considering we opted to do gold spray paint on a few shapes first. The metallic paint fell a little flat for us so that's where the glitter came in. If you want to do the spray paint, just be sure to cover up the shapes around it with paper first. The smell of spray paint in your home should be enough to make you not want to do it, but hey, it's a lesson learned! All ideas can't be good ideas, right?

Be sure to pull off the Frogtape about 10-15 minutes after you finish the last color. This way the paint is still a little pliable if you need to fix it a bit. The Frogtape did a good job for us but there were a few small spots we needed to touch up afterward.

Let your paint dry for several hours before attempting the glitter portion. It gets messy and you don't want the glitter falling into the other colors.

NOW! THE GLITTER! (Sweep your floor if you have hardwood! This way you can just sweep up the glitter and reuse it if needed) Grab some more Frogtape and tape around the shapes you want glittered. It worked out well for us because our base was also gold so it didn't matter if the coverage wasn't even. If you can, I recommend matching the base paint and glitter, but it's not the end of the world if you don't! Now, dip your foam brush in the ModPodge and give your wall shape a good coating of it. Not super thin, but also not so thick that it's runny. As soon as you do the ModPodge on one shape, dump some glitter in your pie plate and fold it up a little bit. (You don't have to fold it like I did, but I noticed it made a huge difference in the coverage on the wall!) Start at the bottom of your shape and blow the glitter onto the wall, moving side to side and upwards. You'll have to do it a couple of times for each shape, but don't worry, it's amazing how much it'll cover! Repeat as necessary on the amount of shapes you want and voila! Remove the Frogtape and you have you a fancy, sparkly, glittered wall!
Office Makeover DIY Geometric Glitter Wall - Kaelah Bee
Kaelah Bee : Office Makeover - Geometric Glitter Wall DIY
Hopefully that was easy enough to follow! I know many of you expressed your excitement at making a geometric glitter wall of your own. I've read so many awesome color palette ideas! I think the mint ombre + silver might be my favorite! (Well, second to my own of course haha!) Mike and I said that if we ever have a little boy we're totally going to do this with a grey wall. (And if we have a girl then voila! We've already got part of the nursery done! Dreaming way ahead there...!) Let me know if you end up giving it a go. I'd love to see some shots of your own walls! Good luck! xo

Wednesday, 11 September 2013

// DIY Wooden Multi-Purpose Box (Picnics! Tools! Crafts!)

DIY Wooden Tool Box (Full + Mini) - Kaelah Bee
Mike has been wanting to build himself a handy little wooden toolbox for some time now, but we finally got around to it a few weeks ago. The best part? The only thing we had to buy for this project was the dowel rod! We had a lot of scrap wood as usual, so we were able to cut all of the pieces out of our overstock. When we realized how easy it was to make one of these little guys, Mike popped outside for about 5 minutes and then came back in with one for Toby, too! Aren't they so cute when placed side by side? If a toolbox isn't your cup of tea, don't worry! You can also use this wooden box for: craft storage and transport, picnics, craft shows, book or vinyl storage, etc. There are so many options for what this little box can do. Aside from the staining the finished piece, construction should average about 15 or 20 minutes! It's a super fast DIY and you don't need any fancy equipment either.
DIY Wooden Tool Box (Full + Mini) - Kaelah Bee
Material List:
One six foot 1x10
One six foot 1x3
One 48 inch 1 1/8" dowel rod
1 1/4" (1.25") nails
Two 2 1/2" screws
Wood Glue

Cut List:
Two 15" 1x10s
One 17" 1x10
Four 17" 1x3s
One 17" dowel rod
DIY Wooden Tool Box (Full + Mini) - Kaelah Bee
ONE: After you have all of the pieces cut, the first thing you need to do is shape your two end pieces. Take one of your 15" 1x10s and start marking off for your cuts. For our design we decided we wanted a 3" top. We also decided, based on how we wanted our side slats to be spaced, that the cut would start 8" from the bottom. 

For the top you will find the center of your board and put a mark 1 1/2" (1.5") out on each side. Now you should have a mark on each side 8" from the bottom and two marks for your 3" top. Take a straight edge and draw a line between those marks on each side. Now cut both sides. I used a jig saw, but you could just as easily use a circular saw or even a hand saw if thats all you have. 
DIY Wooden Tool Box (Full + Mini) - Kaelah Bee
TWO: For each of your joints you'll want to use a little wood glue, so just run a small bead like this before you nail it in place. Make sure to wipe off excess glue that seeps out because it will not accept stain later on. (A good rule of thumb for this project is to put wood glue on every board that touches another board. You'll then nail those meetings in place.)

THREE: Start by nailing your two side pieces to your bottom piece (17" 1x10)
DIY Wooden Tool Box - Kaelah Bee
FOUR: Next put in your first row of side slats (17" 1x3). Nail them in from both the sides and the bottom. 

FIVE: For the next row of slats we decided we wanted the bottom of the top slat to be placed 1 1/2" (1.5") above the top of the bottom slat. So place a mark on each side, line up your board and nail it in place. It helps to get your nail started then line up your board and drive it the rest of the way in. 
DIY Wooden Tool Box (Full + Mini) - Kaelah Bee
SIX: Now it's time to attach the handle. We wanted to use a couple of screws on the handle since thats what will be holding up all the weight. We put the top of the handle 1" down from the top. Just make a mark 1" down centered from the top of each side so that you can line up your handle while you screw it in place.
DIY Wooden Tool Box (Full + Mini) - Kaelah Bee
Now you have a (basically) finished tool box. 

Wait for your glue to dry and then you can sand everything down to get it ready for stain or paint. We used Minwax stain in Red Oak for ours, but any paint or stain would be fine. 

SEVEN: We applied our stain by just wiping it on with an old rag, then we added a finishing wax to shine it up a bit. This is totally optional, but we liked the final result. Now your tool box is ready for any and every occasion! Load it up with your favorite tools, pack it up for a craft night with your girlfriends, or fill it full of yummy bites for a family picnic. You'll be amazed at how handy this little toolbox can be! (You can even finagle it to be a planter or use it for a craft show set up!)
DIY Wooden Tool Box (Full + Mini) - Kaelah Bee
There are so many ways to use this handy little toolbox! I even loaded it up full of pears from our tree in the backyard and took them to some friends I was meeting for dinner. It was a much more stylish way of carrying 10+ pounds of fruit, ya know? I didn't to fiddle with plastic bags or anything like that. Plus I can't get over how adorable Toby's little toolbox is! You can make the sides any size or shape you want as long as the edges where the side slats meet are flat/straight. I'm already dreaming up a few different designs! Maybe I'll make one or two of them and share the finished product on the blog :)

Let me know if you end up making one! I promise you won't be disappointed. xo
 

©2009 Media Jelek | by TNB